Ⅰ. 插件描述
Vim Space ControllerⅡ. 基本信息
|
Ⅲ. 安装方法
使用Vundle管理器安装
在你的.vimrc下添加:Plugin 'vim-ctrlspace/vim-ctrlspace-come-back-be-here':source %
:PluginInstall对于Vundle版本 < 0.10.2,请用上面的Bundle替换Plugin。
使用NeoBundle管理器安装
在你的.vimrc下添加:NeoBundle 'vim-ctrlspace/vim-ctrlspace-come-back-be-here':source %
:NeoBundleInstall使用VimPlug管理器安装
在你的.vimrc下添加:Plug 'vim-ctrlspace/vim-ctrlspace-come-back-be-here':source %
:PlugInstall使用Pathogen管理器安装
在终端中运行以下命令:cd ~/.vim/bundle
git clone https://github.com/vim-ctrlspace/vim-ctrlspaceⅣ. 文档说明
<div align="center">
</div>
Welcome to Vim-CtrlSpace, a comprehensive solution for your Vim editor
providing:
- tabs / buffers / files management
- fast fuzzy searching powered by Go
- workspaces (sessions)
- bookmarks for your favorite projects
The plugin name follows the convention of naming fuzzy search plugins
after their default mappings (like Command-T or _CtrlP_), hence the
plugin mapping is by default Ctrl + Space.
If you have already starred this repo, thank you!
If you have a question, a feature request, or a new
idea, don't hesitate to post new issues or pull requests.
Collaboration is the most awesome thing in the open source community!
Idea by Analogy
Vim-CtrlSpace interface is a window you can invoke by pressing <C-Space>.
The window displays a list of items. You can select those items with <j>,<k>, and <CR> keys.
<p align="center">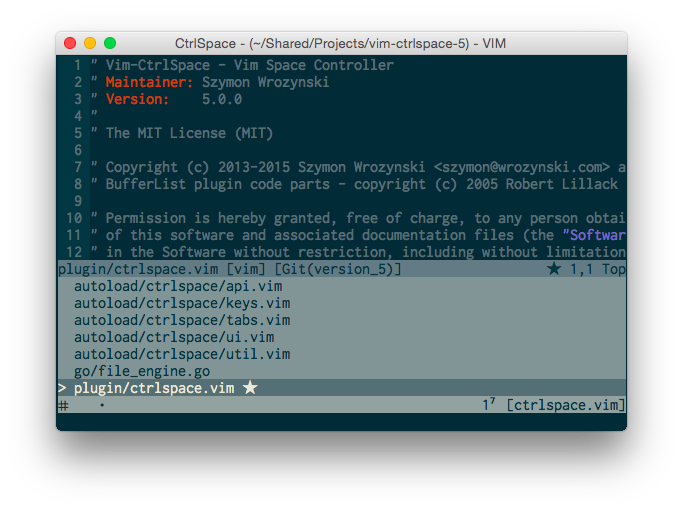
</p>
Generally speaking Vim-CtrlSpace can display 5 types of lists:
- Buffer List
- File List
- Tab List
- Workspace List
- Bookmark List
Lists can be explained with a simple analogy. Let's imagine Vim is
a writing desk. Your projects are like drawers. The Bookmark List
simply displays your favorite projects.
To get documents from a drawer you would need a File List. It allows
you to easily look up contents of a given project. Once you locate and
pick up a file it becomes a buffer.
A buffer is like a sheet of paper lying on the desk. Sometimes you can
have a blank piece of paper – that's a new unsaved buffer. It would become
eventually a file on the disk once saved (put into a drawer). To manage
all buffers on the desk you would need a Buffer List.
So far our analogy is fairly simple. This workflow is straightforward but
inefficient in the long run with a large amount of files. How could we
optimize it?
The answer are tabs – a secret weapon of Vim-CtrlSpace. Each tab
holds a separate list of buffers. And this is something very different
when compared to plain Vim. Tabs powered by the plugin can be seen as
piles of documents on the desk.
With tabs you can, for example:
- group related buffers
- extract to other tabs
- name them accordingly
- move or copy them
Tabs usage in Vim-CtrlSpace is quite more extensive than in Vim. This
is because they serve mainly as independent buffer lists, so you are
likely to have plenty of them. Tabs can be accessed and managed within
Tab List.
All your buffers, tabs, and tab layouts can be persisted as a workspace.
It's like taking a picture of your desk with an instant camera. You can
save multiple workspaces per project with Workspace List.
Getting Started
Installation
If you use Vundle add to your .vimrc:
Plugin 'vim-ctrlspace/vim-ctrlspace'You can also clone the repository to your .vim directory:
cd ~/.vim
git clone https://github.com/vim-ctrlspace/vim-ctrlspace.git .
Basic Settings
First please make sure that you set nocompatible and hidden options,
and set encoding=utf-8 (as required by the plugin) in your .vimrc: >
set nocompatible
set hidden
set encoding=utf-8
If you feel brave enough turn off tabline:
set showtabline=0Tabline in Vim has very limited capabilities and as Vim-CtrlSpace makes
use of tabs intensively, tabline would just get in your way. Tab List
(<l>) makes tabline obsolete ;).
Neovim
Neovim requires adding the following line to your .vimrc or init.vim:
let g:CtrlSpaceDefaultMappingKey = "<C-space> "Note the trailing space at the end of the mapping. Neovim doesn't mind
it, but it makes vim-ctrlspace's "is the mapping left at default" check
fail so it won't change the mapping to <nul>.
Go Engine
The plugin provides engine compiled for popular operating systems and
- By default it will attempt to detect your os and
- To see if auto detection was successful press
<?>.
To speed up the startup of Vim, replace it by a custom simpler one that
restricts to those architectures most probably used by you, and does not
involve system calls. For example, if you use
vim-plug, then by adding to yourvimrc:
if has('win32')
    let s:vimfiles = '~/vimfiles'
    let s:os   = 'windows'
else
    let s:vimfiles = '~/.vim'
    if has('mac') || has('gui_macvim')
        let s:os = 'darwin'
    else
    " elseif has('gui_gtk2') || has('gui_gtk3')
        let s:os = 'linux'
    endif
endif

let g:CtrlSpaceFileEngine = s:vimfiles . '/plugged/vim-ctrlspace' . '/bin/file_engine_' . s:os . '_amd64'
The file engine binaries have been compiled for various OS's and CPU
types, but only those for Linux, MacOS and Windows on 64 bit architectures
are available in the git repository. The other versions for their 32 bit
architecture counterparts, as well as for FreeBSD, NetBSD and OpenBSD
on ARM, MIPS, amd64 and 32 bit architectures can be downloaded at:
<https://git.io/vim-ctrlspace-release-all_os_file_engines>
To find more about setting up the file engines, check:
:help g:CtrlSpaceFileEngineSymbols
Vim-Ctrlspace displays icons in the UI if your font supports UTF8, or
ASCII characters as a fallback. Some symbols (glyphs) might not look well
with the font you are using, so feel free to change and adjust them.
This is the config I use for Inconsolata font in MacVim:
if has("gui_running")
    " Settings for MacVim and Inconsolata font
    let g:CtrlSpaceSymbols = { "File": "◯", "CTab": "▣", "Tabs": "▢" }
endif
Since it's impossible to provide universal character set that would look well
on any machine, therefore the fine tuning is left up to you.
You can find more about this tuning option in the plugin help:
:help g:CtrlSpaceSymbolsIf you feel that you have found a better symbol for a given view, you are
more than welcome to open a pull request.
Glob Command
Another important setting is the Glob command. This command is used to
collect all files in your project directory. Specifically, I recommend
that you install and use ag, as it respects .gitignore rules and is
really fast. Once it's installed you can add this line to your .vimrc:
if executable("ag")
    let g:CtrlSpaceGlobCommand = 'ag -l --nocolor -g ""'
endif
Search Timing
If you usually have to deal with huge projects having 100 000 files you
can increase plugin fuzzy search delay to make it even more responsible by
providing a higher g:CtrlSpaceSearchTiming value:
let g:CtrlSpaceSearchTiming = 500Colors
Finally, you can adjust some plugin colors. By default plugin uses
the following setup:
hi link CtrlSpaceNormal   PMenu
hi link CtrlSpaceSelected PMenuSel
hi link CtrlSpaceSearch   Search
hi link CtrlSpaceStatus   StatusLine
However some color schemes show search results with the same colors as
PMenu groups. If that's your case try to link CtrlSpaceSearch highlight
group to IncSearch instead:
hi link CtrlSpaceSearch IncSearchOf course nothing prevents you from providing your own highlighting, for example:
hi CtrlSpaceSearch guifg=#cb4b16 guibg=NONE gui=bold ctermfg=9 ctermbg=NONE term=bold cterm=boldFirst Steps
Alright! You've hopefully installed, configured Vim-CtrlSpace, and
restarted Vim (otherwise do it!). Now you're wondering how to start using
this thing.
First, you need to select a project. Vim operates in a directory,
described as CWD (_Current Working Directory_). If you've just started
a MacVim it's probably pointing to your home directory (issue :pwd to
check it).
I advise you to add a project to the Bookmark List by opening the plugin
window (<C-Space>) and pressing <b>. The plugin will ask for a project
directory.
Make sure that the path is not your home directory. Otherwise the
plugin will start indexing all your files which will be pointless and
resource exhaustive. Be concrete and provide a real path to a project.
Once your bookmark is created, you can go there with <CR>.
Now open some files with <o>. Finally save a workspace with <w> by
providing your first workspace name.
For more information please check out Vim-CtrlSpace help directly in Vim:
:help ctrlspaceFor key reference press <?> inside the plugin window.
Fuzzy Search Hints
If you are used to hitting the <ctrl-P> key combination for fuzzy search, add
this to your .vimrc file:
nnoremap <silent><C-p> :CtrlSpace O<CR>Be sure to remember to refresh your search file list using <r> command.
Automatically Saving Workspace
Ctrl-Space can automatically save your workspace status based on configurations below:
let g:CtrlSpaceLoadLastWorkspaceOnStart = 1
let g:CtrlSpaceSaveWorkspaceOnSwitch = 1
let g:CtrlSpaceSaveWorkspaceOnExit = 1
Authors and License
Copyright © 2013-2020 [Szymon Wrozynski and
Contributors](https://github.com/vim-ctrlspace/vim-ctrlspace/graphs/contributors).
Licensed under [MIT
License](https://github.com/vim-ctrlspace/vim-ctrlspace/blob/master/plugin/ctrlspace.vim#L5-L26)
conditions.
Vim-CtrlSpace is inspired by Robert Lillack plugin [VIM
bufferlist](https://github.com/roblillack/vim-bufferlist) © 2005
Robert Lillack. Moreover some concepts and inspiration has been taken from
Vim-Tabber by Jim Steward and
Tabline by Matthew Kitt.
Special thanks to Wojtek Ryrych for help and
patience ;) and all
Contributors.